Tubeless Tire Will Not Seat — 5 Fixes That Actually Work
Tubeless setups have gotten complicated with all the conflicting advice flying around. As someone who has converted probably thirty or forty wheelsets to tubeless over the past decade — mountain bikes, gravel rigs, a handful of road setups — I learned everything there is to know about this process through genuine, frustrating failure. Usually at 9 p.m. with sealant on my hands and a ride locked in for 7 a.m. the next morning.
The good news? Stubborn beads almost always give up eventually. You just need to hit the problem in the right order. These five fixes are ranked by how often they actually solve it. Most riders never make it past Fix 2.
Fix 1 — Remove the Valve Core and Try Again
This one solves it for the majority of people. Don’t make my mistake — I spent forty-five minutes on my first tubeless setup pumping furiously with a floor pump and getting absolutely nowhere, because nobody told me this existed.
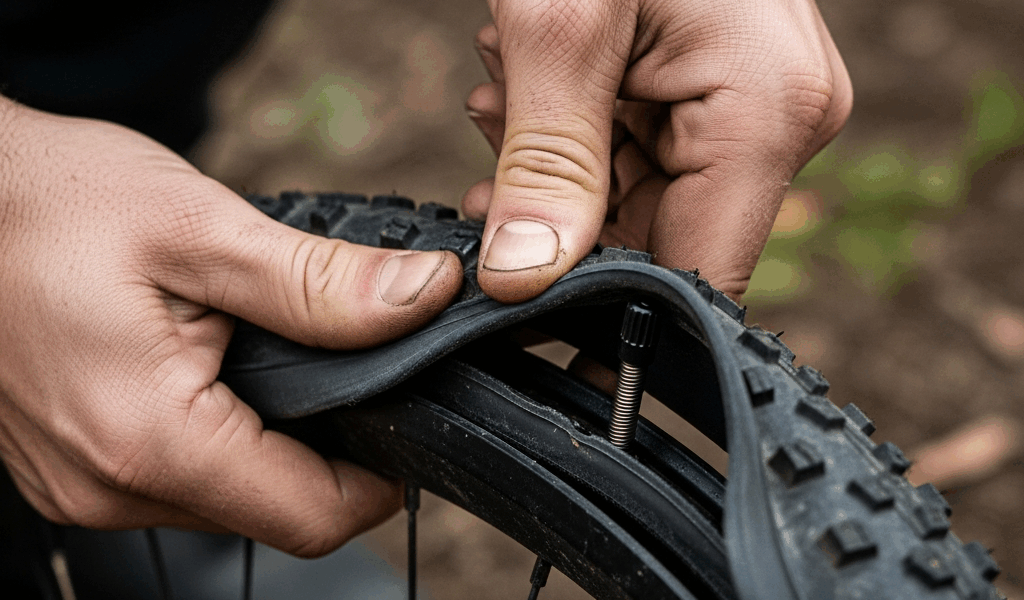
But what is the valve core trick? In essence, it’s removing the small threaded pin inside your valve stem to eliminate airflow restriction. But it’s much more than that — it’s the difference between a trickle and a flood of air reaching the tire.
Tubeless beads need a fast, high-volume burst to pop onto the rim shelf. A standard floor pump — even a decent one like the Topeak Joe Blow Sport III or the Lezyne Steel Floor Drive — pushes air through a narrow stem opening. That bottleneck kills your flow rate. Pull the core and the bottleneck disappears.
You need a valve core removal tool. About three dollars on Amazon, or use the notched end of certain tire levers. Unscrew the core, set it somewhere safe — I once found mine two days later inside a shoe, no idea how — then connect your pump directly to the open stem.
Pump hard and fast. No pausing between strokes. You’re trying to outpace the air escaping around the unseated bead. Most of the time you’ll hear two satisfying pops — one per bead — and that’s it. Tire’s seated. Release pressure, reinstall the core finger-tight then a quarter turn with the tool, inflate to target pressure, then add sealant through the valve.
Honestly, this single fix resolves things probably 60 percent of the time on its own.
Fix 2 — Lubricate the Bead with Soapy Water
Probably should have opened with this section alongside Fix 1, honestly. They work better as a pair than either does alone.
Part of what’s happening with a stubborn bead is pure mechanical friction — the rubber dragging against the rim sidewall instead of sliding up and over onto the shelf. A little lubrication removes that resistance entirely.
Mix about a teaspoon of dish soap — I use original blue Dawn, always have — with water in a spray bottle or a cup. Not a bubble bath. Just enough to make things slick. Apply it generously around both beads, working it into every bit of the interface where tire meets rim.
Don’t use tubeless sealant here. Too thick, gums up before the bead moves. Plain soapy water evaporates clean and leaves nothing behind to mess with your seal.
After applying, bounce the tire firmly on the floor a few times and work the bead toward the center channel with your thumbs. This creates slack and positions the bead to move outward when air hits. Then pump with the valve core removed, same as Fix 1. That combination — lubrication plus unrestricted airflow — seats even nightmare combinations. A Maxxis Assegai on a wide carbon rim, for instance, which is a notoriously tight fit, pops right into place with this method.
Fix 3 — Use a CO2 Cartridge or Compressor
Frustrated by continued failures with my floor pump, I eventually broke down and bought a Viair 88P portable compressor — around eighty dollars at the time. Changed my whole setup experience. But CO2 cartridges work too, and they’re cheaper and easier to carry.
The physics here matter. Seating a bead isn’t just about pressure — it’s about volume delivered fast. A floor pump with the core removed beats one without, but a compressor with a tank beats both. You need to push the bead outward faster than air leaks through the unseated gaps.
For CO2, use a 25-gram cartridge at minimum. Smaller ones don’t have the volume. Attach the inflator to the open valve stem — core out — and release the full cartridge in one continuous shot. Don’t be timid about it. Some people swear the cold temperature of CO2 firms the rubber slightly and helps the bead grip once seated. Apparently that’s debatable, but the volume burst itself definitely works.
Compressor with a tank? Set it to around 120 psi, use a chuck with a locking lever, and hit it for two or three seconds. That’s usually all it takes.
A tubeless-specific floor pump might be the best option if you do a lot of setups, as tubeless work really requires that high-volume release. That is because something like the Bontrager TLR Flash Charger — around seventy dollars — has a built-in chamber you pre-pressurize and then dump all at once, mimicking a compressor burst without the compressor.
Fix 4 — Check the Rim Tape and Valve Seat
Easy to miss. Not obvious at all, actually.
If rim tape isn’t sealed properly over the spoke holes — or if it’s lifting at the edges — air escapes down into the rim bed faster than any pump can replace it. You’ll never build enough pressure to seat the bead. Doesn’t matter how hard you try.
Remove the tire completely and inspect everything. Look for bubbles, lifted edges, wrinkles sitting over spoke holes, gaps near the valve cutout. Tape should be centered, smooth, and making full contact with the rim sidewalls. Press it firmly with your thumb all the way around — extra attention near the valve hole, where lifting tends to start first.
The valve is worth a look too. The rubber base should compress flat against the rim bed and form a clean seal. Overtightened and the base gets pulled into a weird distorted shape. Undertightened and there’s a gap leaking air constantly. Finger-tight plus a half turn with a wrench — that’s the spec for most valves.
If the tape is damaged, wrong width, or just suspect — Stan’s recommends their 25mm tape for rims with internal widths between 19mm and 23mm, for reference — re-tape the whole rim. Twenty minutes of work. Often the only real fix for a rim that refuses to hold pressure during seating.
Fix 5 — Install a Tube to Pre-Seat the Bead
Last resort. Works every single time.
Install an inner tube inside the tubeless tire, inflate to 40 or 50 psi, let it sit a few minutes. The tube pushes the bead firmly outward onto the rim shelf — as decisively as anything possibly can. The bead essentially learns where it’s supposed to live.
Deflate the tube completely. Work the tire off one side and pull the tube out, leaving the other bead fully seated. Reinstall the tubeless valve. Add sealant — I use about 60ml for a 29-inch mountain tire, 30ml for gravel — either through the valve or by breaking the bead back just enough to pour it in. Reseat the open bead by hand, then pump tubeless-style with the valve core removed.
That’s what makes the pre-seating method endearing to us tubeless people — it removes all the uncertainty. Because the bead was already formed into position by the tube, it seats instantly. One or two pumps and both sides pop home.
Don’t make my mistake. The first time I tried this, I didn’t fully deflate the tube before removing it. Still slightly pressurized — slipped right out of my hands and launched sealant across the entire garage floor. Deflate it all the way. Seriously, all the way.
A Few Final Notes
Work through these fixes in order. Don’t jump straight to a compressor before trying the valve core trick — you probably don’t need it. Soapy water costs nothing. Fix 1 and Fix 2 together knock out maybe 80 percent of seating problems before you spend any money or tear your whole setup apart.
Tire and rim compatibility is real. Some combinations are just difficult — a tight bead on a tight-tolerance rim seats hard every single time regardless of technique. That’s not a defect. It’s a tradeoff for reduced burping on the trail. Loose combinations seat easily but may burp at low pressure. Knowing which situation you’re dealing with helps set realistic expectations.
Get the valve core tool. Three dollars. Keep it in your kit bag with your tire levers. It’s honestly the most useful small item in my workshop — the first thing I grab whenever a tubeless setup gives me any trouble at all.


Stay in the loop
Get the latest cyclingfan.org updates delivered to your inbox.