What Chain Skipping Under Load Actually Means
Chain skipping under load has gotten complicated with all the conflicting advice flying around. You’re grinding up a hill or sprinting hard, and suddenly — clunk — the chain lurches forward like it missed a step. That’s not a shifting problem. Shifting issues are cable tension. This is different. This is your chain literally bouncing off a tooth because something in the drivetrain has worn down far enough that it can’t grip when real power hits it.
This article includes affiliate links. We may earn a commission at no extra cost to you.
But what is chain skip under load, exactly? In essence, it’s a mechanical mismatch between worn components. But it’s much more than that — it’s a warning sign that your drivetrain parts have stopped speaking the same language. The geometry that made them work together cleanly has degraded. Something needs replacing, realigning, or both. That’s the short version. The actual answers are in the steps below, so without further ado, let’s dive in.
Step 1 — Check Chain Wear Before Anything Else
I learned this the hard way. Spent sixty dollars on a new cassette when my bike just needed a twelve-dollar chain. Don’t make my mistake.
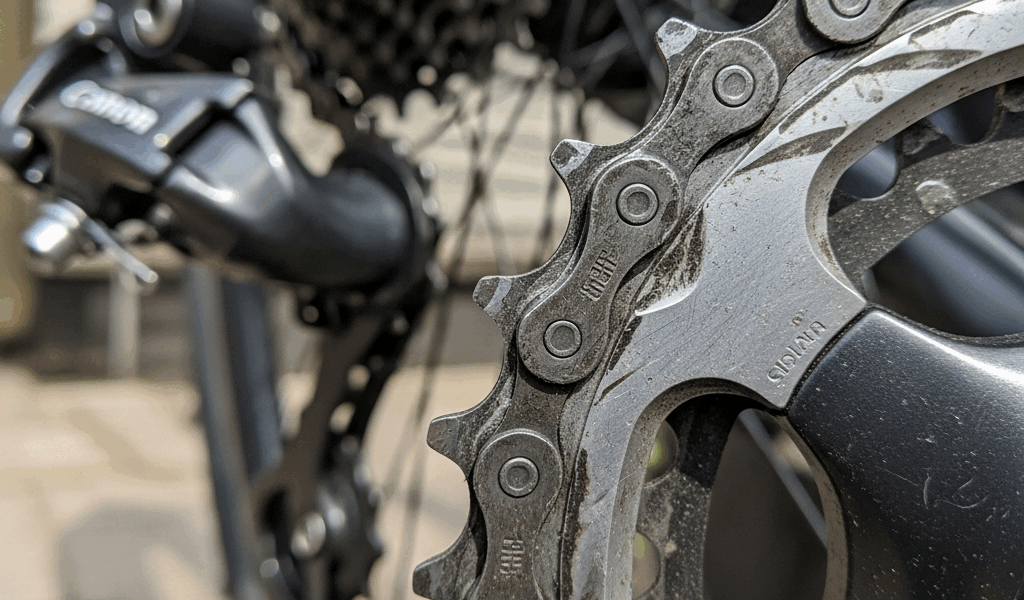
Chain stretch is the real villain here. A stretched chain has elongated pins and rollers — the spacing goes wrong, so when you load it with body weight and leg force, it skips over the cassette tooth instead of biting down. The tooth profile and the chain pitch stop matching. It’s a small gap that feels catastrophic when you’re halfway up a climb.
Buy a chain checker tool. The Park Tool CC-3.2 runs about twelve dollars and takes maybe three seconds to use.
Check three different spots on the chain, not just one. If you hit 0.75 percent wear or higher, the chain is done. Replace it immediately.No tool handy? There’s a low-tech option. Grab a link over the smallest chainring, pull it hard toward the tooth tip, and watch the gap. If your thumbnail fits between the chain and the tooth, the stretch is bad enough to cause skipping under load.
Here’s the part people get wrong: slapping a fresh chain onto a worn cassette still causes skipping. The new chain is too precise for the hooked, degraded teeth. So replace the chain first, ride it hard for a week, then move to cassette inspection if the problem continues. This order matters — financially, especially.
Step 2 — Inspect the Cassette for Shark-Fin Teeth
Probably should have opened with this section, honestly — most riders jump straight to blaming the cassette without ever touching a chain checker. But doing it this way saves you real money, so the order stands.
Pull the wheel and look at the sprockets from the side. Worn cassette teeth are unmistakable once you know what you’re seeing. They hook forward at the tip instead of sitting symmetrical and square. Shark fins. That’s the exact shape.
Check the gears you ride most. On a gravel or mountain bike, that usually means mid-range sprockets. Road riders, look at whatever sits in your typical cadence range. Those teeth carry the most hours and wear first — sometimes dramatically faster than the rest of the cassette.
Material matters more than most people realize. A Shimano or SRAM steel cassette — something like the Shimano CS-HG500 — can handle 10,000 to 15,000 miles with decent chain maintenance. Aluminum cassettes are lighter, look great in photos, and wear out somewhere between 8,000 and 12,000 miles. Neither choice is wrong. Aluminum just asks for more frequent replacement if you ride hard and often.
When do you pull the trigger on a new cassette? If your chain measured under 0.5 percent wear and skipping persists, the cassette is your answer. Replace both the chain and cassette together as a paired set — that’s what ensures clean engagement and keeps skip from coming back two weeks later.
Step 3 — Check Cable Tension and Derailleur Hanger
Frustrated by a skip that survived new chain and cassette installation, many riders never think to look at the hanger — that small aluminum arm bolted to the frame that holds the derailleur body in place. A bent hanger, whether from a crash, a rough bag toss, or just bad luck, can throw off the chainline just enough that under real load, the chain skips. It mimics wear almost perfectly.
Stand directly behind your bike. Look at the derailleur hanger relative to the cassette — they should be perfectly parallel, same plane, no angle. Even a subtle forward tilt means the hanger is bent. A shop realignment runs thirty to fifty dollars. Replacing the hanger itself is fifteen to eighty dollars depending on your frame; some frames use proprietary hangers that cost more and require ordering. Worth checking your model number before assuming.
Cable tension is the other culprit hiding in this step. I’m apparently someone whose cables stretch noticeably within the first fifty miles after installation, and a half-turn on the barrel adjuster fixes everything — while ignoring it never does. New cable housings settle. The inner wire stretches slightly. The derailleur drifts out of position just enough to cause skip under load. Turn the barrel adjuster counterclockwise by half a turn, shift through the gears, test. Repeat until it’s gone. Free fix. Ninety seconds.
Honestly, cable tension catches people off guard because they assume the shop finished the job completely. Most shops do solid work — but the first adjustment after new cables is expected follow-up, not a warranty claim. If no one told you this when you picked up your bike, now you know.
When to Just Take It to a Shop
Home diagnosis has a ceiling. Jockey wheel wear — the small 11-tooth pulleys that guide the chain through the derailleur — creates skip that feels exactly like cassette wear. On high-mileage bikes pushing 15,000 miles or more, jockey wheels and cassette can wear out simultaneously, which makes isolating the real culprit genuinely difficult without swapping parts one at a time.
A bent derailleur body, not just the hanger, is also hard to catch at home. The bend can be subtle enough to pass a visual inspection but still show up under load. Hanger alignment tools run thirty to fifty dollars — and if you push too hard trying to straighten it yourself and snap the hanger, you’re looking at eighty to one-fifty for a replacement, assuming your frame’s hanger is in stock.
Skip that appears only on one specific cog — say, the third sprocket from the smallest — after you’ve already ruled out chain and cassette wear, usually means a single damaged tooth. Some cassettes allow individual cog replacement. Others require a full swap. That depends entirely on the model, which takes a quick lookup or a shop visit to confirm.
Here’s your diagnostic order, cleanest to most involved:
- Check chain wear with a chain checker tool — under 0.5% means the chain is fine
- Inspect cassette teeth from the side for shark-fin hooking
- Check derailleur hanger alignment from directly behind the bike
- Micro-adjust cable tension using the barrel adjuster, half-turn at a time
- If skip survives all four of these steps, book a shop appointment
This sequence moves from cheapest to most labor-intensive — which is exactly how you want to troubleshoot anything mechanical. Fix the twelve-dollar problem before spending eighty on the one that might not be the cause.


Stay in the loop
Get the latest cyclingfan.org updates delivered to your inbox.