Warning Signs Your Brake Pads Are Done
As someone who commuted on the same road bike for five years before replacing a single brake pad, I learned everything there is to know about ignoring warning signs until they bite you. Today, I will share it all with you.
Your brake pads worn out — how to tell? Honestly, the bike will just tell you. You only have to pay attention.
Start with what you hear and feel:
- Squealing or squeaking during braking — especially on those first few stops after the bike sits overnight in a cold garage
- Longer stopping distances than you remember, even when you’re pulling the lever as hard as it goes
- A pulsing or vibration through the brake lever under moderate braking
- That unmistakable grinding sensation — metal on metal, no question about it
- A mushy lever that needs full finger extension before anything actually slows down
Now look. Worn pads go glazed and shiny instead of having that slightly textured finish fresh compound shows. The wear groove lines across the pad face disappear first. On disc brake pads, the friction material just keeps shrinking. Less than 1 millimeter left? Replace them today — not this weekend, today.
Probably should have opened with this section, honestly. A thirty-second visual check saves you from a genuinely scary panic stop situation later.
Rim Brake Pads vs Disc Brake Pads — What to Look For
The diagnostic approach differs enough that you need to know which system you’re running before anything else.
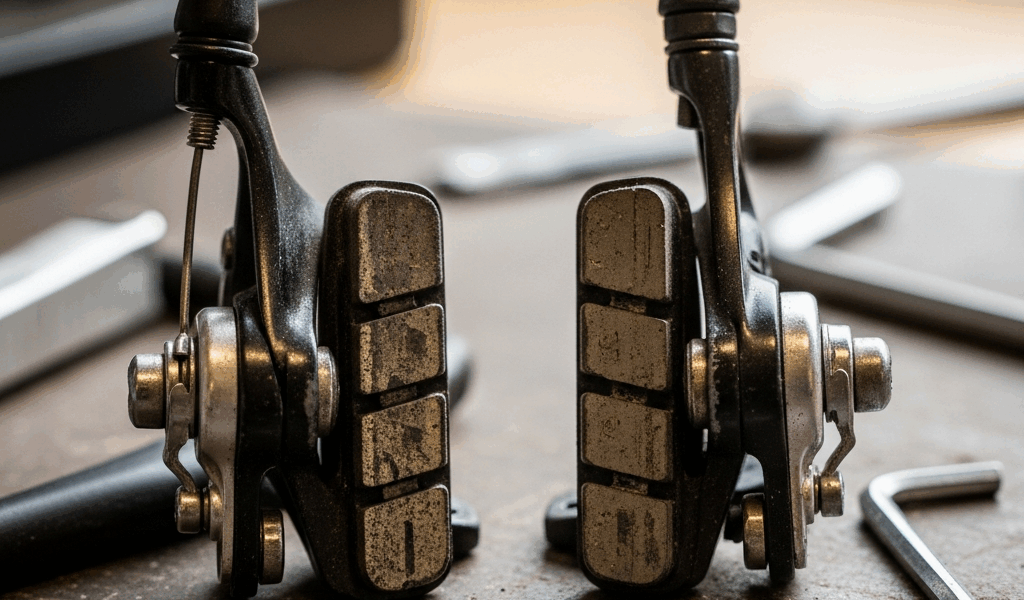
Rim Brake Pads
Pull the bike toward you and look at the pad from the side. Most rim pads have horizontal grooves molded into the compound — those grooves are essentially your built-in wear indicator. When they vanish completely, the pad is done. A fresh rim pad runs roughly 6–8 millimeters thick. Can’t see any groove detail anymore? You’re below 1.5 millimeters and riding on borrowed time.
Inspect the rim’s braking surface while you’re at it. Embedded grit, aluminum shavings, actual metal shards stuck in the pad — any of that signals either rim damage or fragmenting pads. Clean everything with a dry brush or an old toothbrush before touching the new pads.
One more thing. Check whether the pad sits flush against the rim’s braking surface. A misaligned pad contacting the tire sidewall is worthless — and it will wear unevenly from the first ride. Square contact or nothing.
Disc Brake Pads
Disc pads are harder to eyeball without pulling the wheel. Remove it, then look straight into the caliper. The friction material — usually black or dark red compound — should measure at least 1.5–2 millimeters thick. Bare metal backing plate visible? Compound under 0.5 millimeters? That pad is finished and it’s damaging your rotor with every single stop.
Some modern calipers have a wear sensor built in, triggering an audible click as the pad thins out. Not all do. I’m apparently someone who rides hydraulic Shimano disc brakes and checks pads every few weeks while a friend with SRAM never checks until something sounds catastrophic. Don’t make my friend’s mistake. If your bike has hydraulic discs, wheel removal takes about 90 seconds — just check regularly instead of waiting for noise.
How to Replace Road Bike Brake Pads — Step by Step
Rim Brake Pad Replacement
This takes five minutes. While you won’t need a full tool kit, you will need a handful of basics — an Allen wrench, usually 2mm or 2.5mm, that you almost certainly already own.
- Loosen the pad retaining bolt — the single Allen bolt holding the pad to the brake arm. Back it out halfway, not all the way.
- Slide the old pad straight out of the holder. It may stick a little if grit has worked its way in over the miles.
- Insert the new pad. Line it up so the friction material sits squarely on the rim’s braking surface — not touching the tire sidewall, not angling downward into open air.
- Tighten the bolt. Then check that the pad is still parallel to the rim afterward, because the torque sometimes shifts the angle slightly during tightening.
- Repeat on the other brake arm.
- Squeeze the lever hard a few times to seat the pads. You should feel immediate, solid resistance.
Common mistake I made: installing the pad at a slight angle so the rear edge contacted the rim before the front. It squealed for 50 miles on my commute until I finally realigned it. Square is the only angle that actually works. That was a frustrating two weeks.
Disc Brake Pad Replacement
Slightly more involved, but still completely doable at home. While you won’t need a professional stand or specialized equipment, you will need a tire lever and about 10 minutes.
- Remove the wheel — most road bikes use quick-release levers or thru-axles, so this part is genuinely fast.
- Using a tire lever or an old brake pad, push the pistons back into the caliper body. You’re creating space for the thicker new pads. Push gently — no forcing.
- Unclip or slide out the old pads. Shimano, SRAM, and TRP all design theirs slightly differently, so check whether yours have a clip-out tab or slide straight back.
- Drop in the new pads, making sure both sit flat inside the caliper slots. Twisted pads are a noise problem waiting to happen.
- Reinstall the wheel and tighten accordingly.
- Spin the wheel and confirm the rotor isn’t rubbing before you head out.
Disc pads come in resin compound — quieter, less raw stopping power, cheaper at around $12–$18 a set — or sintered metal, which runs louder but lasts longer in wet conditions and costs closer to $25–$35. Road riders usually prefer resin for everyday commuting, sintered for racing or constant rain. Most OEM road brake pads ship as resin, so start there unless you’re riding through genuinely brutal weather every day.
How Often Should You Replace Road Bike Brake Pads
Rim pads last roughly 1,000–3,000 miles depending on conditions. Dry, clean pavement? You’ll stretch toward that 3,000-mile mark without much trouble. Wet, gritty urban commuting — the kind with puddles and gravel and road salt — expect 1,200 miles or less. I hit around 1,400 miles on my winter commute before pads were noticeably thin.
Disc pads wear faster. Typically 500–700 miles under normal conditions, sometimes as little as 300 miles if you’re riding in heavy rain constantly or dealing with sandy or salty roads. That’s not a flaw — that’s just the physics of disc braking working as intended.
The real variable is how you actually brake. Coasting to stops and feathering the lever? Pads last longer. Two fingers always on the lever, ready to scrub speed at a moment’s notice? They wear faster. Check your pads every 200 miles and you will genuinely never be caught off guard.
Brake Still Feels Off After New Pads — Here Is Why
Fresh pads installed, everything tightened down, and the brake still feels weak or makes noise. That happens to everyone at least once. Here are the actual reasons — and the fixes.
Disc Pads Need Bedding In
New disc pads come with a hard, shiny surface that doesn’t grip the rotor at full strength until you’ve scuffed things up and transferred some friction material onto the rotor face. Do 10 moderate braking stops from around 15 mph — not emergency stops, just normal controlled slowing. After those 10 stops the brakes will feel noticeably more responsive. That’s especially true for sintered metal pads, which need more break-in time than resin.
The Rotor Is Contaminated
Touched the rotor with bare hands, splashed it with brake fluid, or rode through a puddle full of road salt — any of those will leave a film that repels new pads. Wipe the rotor with rubbing alcohol and a clean lint-free cloth. Let it dry fully. Then bed in the pads as described above. That’s usually all it takes.
Caliper Needs Realignment
Frustrated by brakes that feel fine mechanically but still drag or pull unevenly, most riders overlook the caliper — which drifts out of alignment almost every time you remove the wheel. Loosen the two caliper mounting bolts slightly, squeeze the brake lever to center the pads against the rotor, then tighten the bolts while holding lever pressure. This recenters everything. Simple fix, easy to forget.
The Rim or Rotor Surface Is Worn
New pads can’t fix a flat spot on the rim or a rotor warped from heat. Spin the wheel slowly and watch the braking surface. A minor wobble is normal. A visible gap that opens and closes as the wheel turns? That surface needs professional attention — and new pads were never going to solve it anyway.
In most cases, fresh pads work immediately after a short bedding period. If something still feels genuinely wrong after that, you’ve found a larger issue that would have gotten worse regardless. Better to know now than mid-descent.


Stay in the loop
Get the latest cyclingfan.org updates delivered to your inbox.