How to Tell What Is Actually Wrong
Rear derailleur troubleshooting has gotten complicated with all the conflicting advice flying around. As someone who spent three hours turning barrel screws on a bike that had a bent hanger the whole time, I learned everything there is to know about diagnosing shifting problems. Today, I will share it all with you.
Before you touch a single screw, figure out which symptom you’re actually dealing with. The fix changes completely depending on whether your bike slugs through upshifts, jumps gears randomly under load, or just refuses to reach one end of the cassette. Skipping this step is exactly why most riders end up spinning adjustment screws in circles. Getting nowhere. Frustrated.
Here are the three failure patterns worth knowing:
- Sluggish upshifts to harder gears. You click the shifter and the chain takes a half-second — or longer — to move. Feels like it’s fighting you. Cable tension is almost always too loose here. The derailleur just isn’t pulling hard enough to push the chain across the sprockets cleanly.
- Ghost shifts or random chain movement under load. The chain jumps between sprockets on its own while you’re pedaling steady. Unsettling, honestly. This happens when cable tension is cranked too tight, or when limit screws are letting the derailleur travel further than it should.
- Complete refusal to reach one end of the cassette. You can hit five of seven gears just fine, but the derailleur stops short — won’t push to the smallest cog or pull all the way to the largest. That points to limit screws, a bent hanger, or actual internal derailleur damage.
Knowing which one you have saves an hour of wasted effort. Read the sections that match your symptom. Skip the rest. That’s what makes this kind of systematic approach endearing to us wrench-it-yourself riders. So, without further ado, let’s dive in.
Fix Cable Tension First — It Solves Most Cases
Cable tension causes the majority of shifting complaints. Full stop. I learned this the hard way after assuming something exotic was broken, when really the solution was three half-turns of a barrel adjuster. Don’t make my mistake.
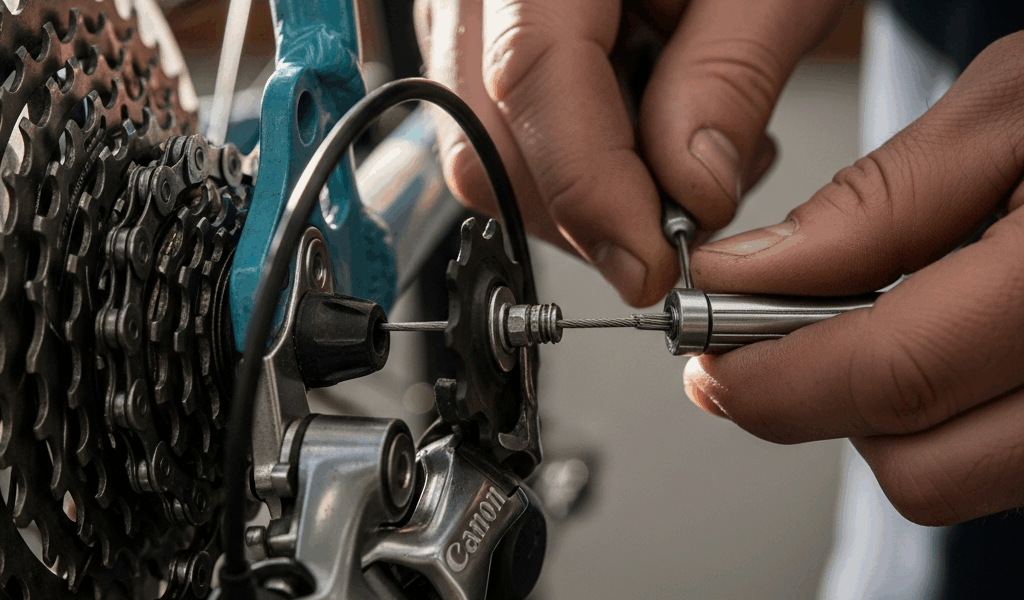
But what is a barrel adjuster? In essence, it’s a small cylindrical fitting — threaded inline with your cable housing — that you can twist to change how much tension the cable carries. But it’s much more than that. It’s your first and best tool for dialing in derailleur response without touching a single bolt.
Your rear derailleur cable runs from the shifter down to this adjuster — usually mounted right on the derailleur body, though some bikes have one on the down tube or chainstay. Turning it counterclockwise loosens tension. Clockwise tightens it. The derailleur needs just enough tension to move the chain cleanly between sprockets without overshooting or hesitating.
Here’s the technique:
- Shift into the middle of your cassette — the 4th sprocket on a 7-speed or 9-speed, or the middle position on a 10 or 11-speed.
- Spin the cranks and listen. Any scraping or rubbing of the chain against the derailleur cage means something’s off. Chain rubbing the inner cage? Turn the barrel adjuster counterclockwise by half a turn to back off tension.
- Test shift up to a harder gear — smaller sprocket. The chain should move promptly, within a quarter-second. Hesitates or won’t move? Turn the barrel adjuster clockwise by half a turn to add tension.
- Repeat until shifts are snappy and the chain runs clean through the middle gears.
Pay attention to how it actually feels under your hand. Too-loose tension makes shifts slow and uncertain — the derailleur just kind of wanders over. Too-tight tension makes the chain jump or overshoot a sprocket entirely. You want the middle zone. Crisp shift. Soft landing. You’ll feel it when it’s right.
Not every bike has a barrel adjuster on the derailleur itself. Road bikes running Shimano 105 or higher, and most gravel builds, put the adjuster on the down tube or tuck it under bar tape near the lever. If you can’t find it there, check the chainstay. It’s always mounted inline with the cable housing — always a small cylindrical component with a slot you can turn with a 2mm Allen key or a flat-head screwdriver.
While you won’t need a full cable replacement just yet, you will need a barrel adjuster somewhere in the system. If your bike genuinely has none, Jagwire and Wolf Tooth both make inline barrel adjusters — the Jagwire Pro runs about $12, Wolf Tooth’s version about $22 — that clamp around existing cable housing. Probably should have opened with this option, honestly. It saves you from disconnecting the cable at the derailleur anchor bolt and starting from scratch.
Check and Adjust the Limit Screws
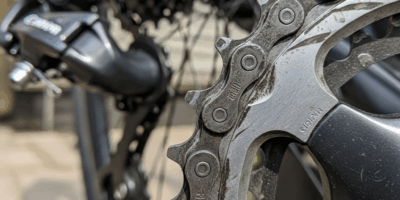
Your rear derailleur has two limit screws — labeled H and L on most models. These set the hard boundaries of derailleur travel. The H screw stops the cage from overshooting past the smallest cog. The L screw prevents it from traveling past the largest sprocket and dropping the chain into your spokes. That second scenario is as bad as it sounds.
Limit screws are usually brass or steel Allen bolts — 2mm on most Shimano derailleurs — sitting on the back face of the derailleur body. Shimano marks them clearly with cast lettering. SRAM hides them better, but they’re still there. Check your derailleur manual if you’re stuck. That was my move with a first-gen SRAM Rival rear mech, and it saved me twenty minutes of hunting.
Clamp your bike in a stand and shift to the largest sprocket — lowest gear. Turn the cranks slowly by hand so the chain actually engages. Look at where the derailleur cage sits relative to the chain. Close enough to guide it, but not rubbing.
Cage rubbing the outer side of the chain? Tighten the L screw — turn it clockwise — by a quarter turn. That pulls the derailleur away from the spokes. Test again. If the cage is sitting too far away and the chain wants to fall toward the frame, loosen the L screw by a quarter turn.
Now shift to the smallest sprocket. Spin by hand again. The cage should sit close but not rubbing on the inner side. Rubbing there? Loosen the H screw — turn it counterclockwise — a quarter turn. That lets the derailleur move closer to the sprocket. Too far away? Tighten the H screw clockwise.
These changes are small and incremental — and I mean that literally. Half-turns or full turns are almost always too much. Test between every single adjustment. That’s not overcautious. That’s just how limit screws work.
Bent Derailleur Hanger Is the Cause Nobody Checks
Frustrated by cable-tension guides that never solved my problem, I eventually started digging into hanger alignment — and that’s exactly where my actual issue was hiding the whole time.
But what is a derailleur hanger? In essence, it’s a small replaceable piece of aluminum bolted between the frame dropout and the derailleur itself. But it’s much more than that — it’s a sacrificial component designed to bend during a crash instead of cracking your frame. Even a 2mm bend throws off alignment across the entire cassette. Not just one end. Everything starts feeling wrong.
Quick eyeball check: stand directly behind the bike and look straight at the derailleur from the rear. The derailleur cage should sit parallel to the cassette sprockets — flat, not angled. If it looks tilted inward or outward even slightly, the hanger is bent. This new awareness took off several years later in the cycling community and eventually evolved into the standard diagnostic step enthusiasts know and rely on today.
A dedicated hanger alignment gauge — the Park Tool DAG-2.2 runs $35 at most shops — measures this precisely. You bolt it into the derailleur mounting hole, rotate it around the wheel, and watch for any deviation. Any movement off parallel means a bent hanger. I’m apparently someone who eyeballs it first, and that method works for me while the gauge never felt necessary until a particularly bad crash. Your call on which approach you prefer.
A slightly bent hanger can sometimes be carefully bent back using an adjustable wrench. I’ve done it twice and gotten lucky both times. But the right answer is replacement. Hangers are specifically designed to bend instead of letting the frame break — they’re meant to be swapped out, not straightened and reused. Replacements run $15 to $40 depending on your frame brand and take about ten minutes to bolt on.
When the Derailleur Itself Is the Problem
If cable tension is correct, limit screws are dialed, and the hanger is straight — but shifting is still rough — the derailleur itself has damage. That’s a hard conclusion to reach, but sometimes it’s just the truth.
Spin the jockey wheels by hand. They should spin freely with no grinding or stuttering. Seized bearings mean replacement. Cleaning and lubing won’t bring them back. A new derailleur solves this where nothing else will.
Check the pivot springs by running through the gears with zero chain tension — lift the rear wheel off the ground and shift. The derailleur should snap back decisively toward the largest sprocket when you release the shifter. Slow or weak return means the spring is worn out. Again, new derailleur time.
Look at the derailleur cage itself in bright light — natural light if you have it. Bends or hairline cracks mean replacement. A bent cage won’t guide the chain smoothly even if every other variable is perfect.
Be honest with yourself here. If adjustments don’t work and the hanger is straight, the derailleur is worn out. That’s okay. A mid-range Shimano Altus RD-M2000 runs about $25. A SRAM Apex 1 rear mech runs closer to $75. Both last years under normal riding conditions.
Quick recap: Start with symptom identification. Adjust cable tension in half-turn increments. Set limit screws in quarter-turn increments. Eyeball the hanger for visible bends before assuming anything internal. Only then consider derailleur replacement. This order solves 90% of shifting problems — without buying anything you don’t need.


Stay in the loop
Get the latest cyclingfan.org updates delivered to your inbox.