How to Tell If Your Handlebar Height Is Actually the Problem
Handlebar height has gotten complicated with all the conflicting advice flying around. Lower is faster. Higher is comfortable. Your stem angle matters more than spacers. Everyone has an opinion. After a brutal 90-minute ride last fall, I stopped listening to opinions and started paying attention to my body — specifically the sharp neck pain that hit every time I tried to turn my head left. I blamed my pillow for two weeks. Turns out, my bars were sitting three centimeters too high and I’d been craning upward the entire time, shoulders creeping toward my ears like I was perpetually startled.
That was embarrassing to figure out. Don’t make my mistake.
Symptoms of Bars Set Too High
- Neck tightness after 45 to 60 minutes — Usually the first sign. Your head sits too upright, so instead of a neutral gaze you’re constantly looking down at the road. Forty-five minutes of that adds up fast.
- Rounded lower back — High bars push your weight backward. Your lumbar spine takes the compression hit, especially past the two-hour mark.
- Shoulder tension — You’re not reaching far enough, so your arms stay tucked and your shoulders bunch. Classic overreach posture, even though it feels like the opposite problem.
- Hands going numb — Weight distribution shifts wrong. Nerve pathways in your palms and fingers start complaining around mile 20.
Symptoms of Bars Set Too Low
- Lower back and hamstring strain — Your torso stretches too aggressively forward. Climbs make this worse — the moment you sit upright, everything pulls.
- Wrist and forearm pain — Too much weight landing on your hands. Carpal tunnel territory if you ignore it long enough.
- Excessive fatigue in the neck and shoulders — Different sensation from the high-bar version. Low bars force your upper body to work constantly just to stabilize itself.
- Hand numbness from bearing load — Ironically, both extremes cause this. Low bars often produce the worse cases because weight concentration spikes.
- Feeling “stretched out” even on short rides — The geometry is too aggressive. Your body never finds a position that feels settled.
Probably should have opened with this section, honestly. Most riders start tinkering before they’ve actually named what hurts. Once you know which direction your problem lives in — too high or too low — the fix becomes obvious. So, without further ado, let’s dive in.
What Controls Handlebar Height on a Road Bike
But what is handlebar height adjustment, really? In essence, it’s moving your contact point up or down through three mechanical levers: stem spacers, stem angle, and steerer tube length. But it’s much more than that — each lever affects the others, and pulling the wrong one wastes an afternoon.
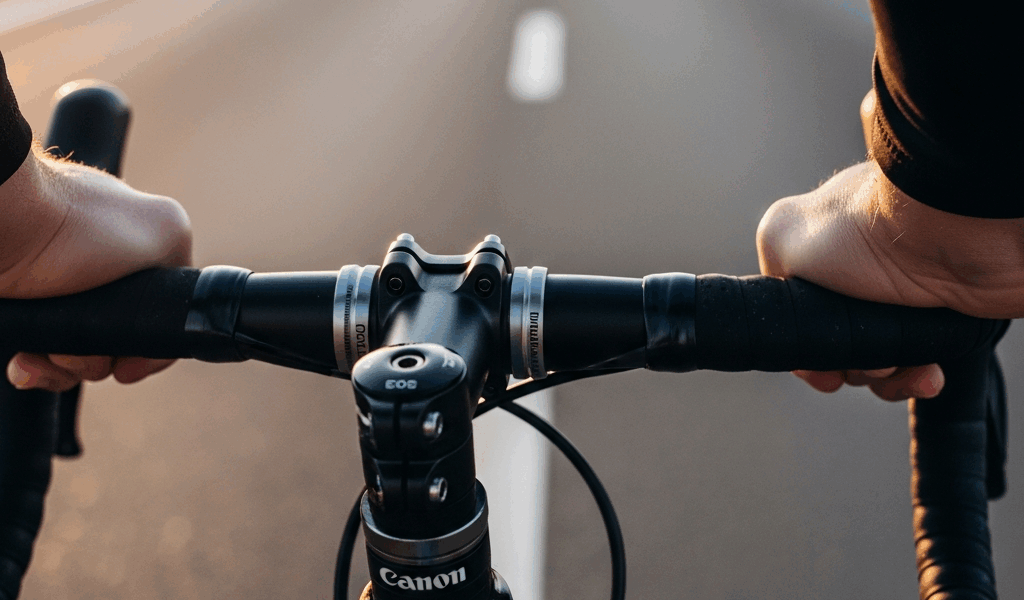
Stem Spacers
Spacers are aluminum or plastic rings — usually 5mm or 10mm tall — stacked on your steerer tube above and below the stem clamp. Move spacers above the stem and your bars rise. Move them below and bars drop. That’s it. This single adjustment fixes probably 70% of handlebar height complaints and most riders never try it. The rings just sit there, doing nothing useful, while people buy new bikes.
Stem Angle and Rise
Stems come with positive rise or negative rise. A +6 degree stem angles upward slightly. A -17 degree stem points down hard. I’m apparently a +6 degree person and my current Ritchey WCS works well for me while the -17 stem on my old Specialized never felt remotely comfortable. Same spacer stack on both bikes — wildly different bar positions. The stem angle was doing more work than I realized.
Steerer Tube Length
The steerer tube is the vertical section of your fork that pokes up through the head tube. Your stem clamps onto it. Spacers can only stack as high as this tube allows — once you’ve hit the top, that’s your ceiling. Some bikes have very little steerer tube exposed above the head tube, which limits how high you can push bars without swapping hardware entirely.
Threadless vs. Threaded Stems
Modern road bikes — anything built after roughly 2005 — use threadless stems. These clamp onto the steerer tube from the outside using a side bolt. Older bikes used threaded stems screwed directly into the steerer. This guide assumes threadless. If your bike predates 2005, check which type you’re dealing with before touching anything.
Raise or Lower Your Bars Using Stem Spacers
This is the core fix. While you won’t need a full workshop setup, you will need a handful of basic tools. The whole process runs about 15 minutes — less if you’ve done it before.
Tools You’ll Need
- 4mm or 5mm Allen wrench — check your stem bolt first, most use 4mm for the main clamp
- Torque wrench set to 5Nm — more on why this matters below
- Small bowl or zip-lock bag to keep spacers organized while you work
Step One — Loosen the Stem Clamp Bolt
Find the bolt on the front face of your stem — the one that bites into the steerer tube. Loosen it two full rotations with your Allen wrench. Don’t pull it all the way out yet. You want the stem loose enough to wiggle up and down, not loose enough to drop onto your top tube.
Step Two — Lift the Stem
Pull the stem upward gently. It should slide along the steerer without much resistance. If it sticks, give the clamp bolt another half-turn of loosening. You’re not removing the stem completely — just separating it from the spacers sitting beneath it.
Step Three — Move Your Spacers
Now you can see the full spacer stack. Each ring is typically 5mm to 10mm tall — check yours before assuming. To raise bars, pull spacers from below the stem and stack them above it. To lower bars, reverse that. Move one spacer at a time. Overcorrecting by moving three at once is how you end up doing this four times in one afternoon.
Before touching anything, document your starting position. Take a photo on your phone. Write down how many spacers sit above versus below on a piece of tape stuck to your top tube. You’ll want that reference if the adjustment makes things worse.
Step Four — Retighten to 5 Newton-Meters
This step is non-negotiable. A torque wrench might be the best option here, as stem adjustment requires precise clamping force. That is because over-tightening cracks carbon steerer tubes and strips aluminum — and under-tightening lets your stem rotate under hard efforts, which is genuinely dangerous. Five newton-meters is the target. Not five-ish. Five.
A basic torque wrench runs $25 to $40 at most hardware stores. I use a Park Tool TW-6 — about $60 — and it’s paid for itself in avoided mechanic visits. Many local bike shops will torque your stem bolt for $5 if you bring the bike in pre-adjusted. Worth knowing.
Step Five — Test Ride for 20 Minutes
Don’t plan a century. Don’t even plan an hour. Ride a flat, easy 20-minute loop close to home. Pay attention to three things: neck tension, shoulder position, wrist pressure. One spacer change usually solves the problem outright. If discomfort persists, go back and move another spacer — then test again. Same loop, same 20 minutes.
When to Flip or Swap the Stem Instead
Spacers run out eventually. Move all available spacers above the stem and bars still sit too low — flipping or swapping is next. That’s what makes the stem itself endearing to us tinkerers: it gives you another full range of adjustment when spacers are exhausted.
The Stem Flip
Most road stems ship with positive rise — somewhere between +6 and +17 degrees. Flip the stem 180 degrees and positive becomes negative. A +6 stem flipped produces roughly 10 to 12mm of additional drop without buying anything. Fast fix. Free fix.
The downside is real though. Negative stems feel harsher. Your reach increases. Your wrists hit a different angle. Flipping works as a quick fix or an experiment, but rarely feels as dialed as the original spacer-adjusted setup.
Stem Swap
If flipping doesn’t land in the right place, buy a new stem. A Deda Elementi Zero or FSA Energy runs $40 to $80 — reasonable for a component that controls your entire upper-body position. Pick rise based on where you actually need your bars: +6 to +10 degrees covers most endurance road bikes, +17 suits aggressive race setups.
One hidden gotcha that catches people: stem length affects reach, not just height. A 90mm stem pulls you more upright than a 110mm. If your current stem is 90mm, replace it with 90mm unless you’re deliberately adjusting reach at the same time. Changing rise and length simultaneously makes it impossible to know which variable fixed — or broke — the fit.
How to Know When You Have Got It Right
Correct bar height feels almost invisible. Your elbows sit bent 15 to 25 degrees. Shoulders drop and stay dropped. Your neck stays neutral — no craning upward, no chin tucking down. You can hold the drops for 45 minutes and forget your hands exist.
The 20-minute test ride tells you most of what you need to know. Neck loose, wrists supported, no pulling sensation in the lower back — you’ve nailed it. If tightness returns somewhere around the 30-minute mark, go back and move another spacer. The answer is in there.
Professional bike fits run $150 to $300 and make sense after you’ve adjusted spacers twice and still feel wrong. First, you should exhaust the obvious mechanical fixes yourself — at least if you want to get real value from a fitter’s time. A good fitter measures actual reach, flexibility, and asymmetries using tools you don’t own. They’re worth every dollar once you’ve already eliminated the simple stuff.


Stay in the loop
Get the latest cyclingfan.org updates delivered to your inbox.