Why Cleat Position Wrecks Your Knees
Knee pain on the bike has gotten complicated with all the conflicting advice flying around. Ice it. Stretch more. Buy new shoes. I spent three full seasons blaming my knees for what turned out to be a $12 bolt problem — cleats sitting half an inch too far forward. That’s it. The knee doesn’t care about your training plan or your VO2 max. It cares about alignment, and it will make that very clear.
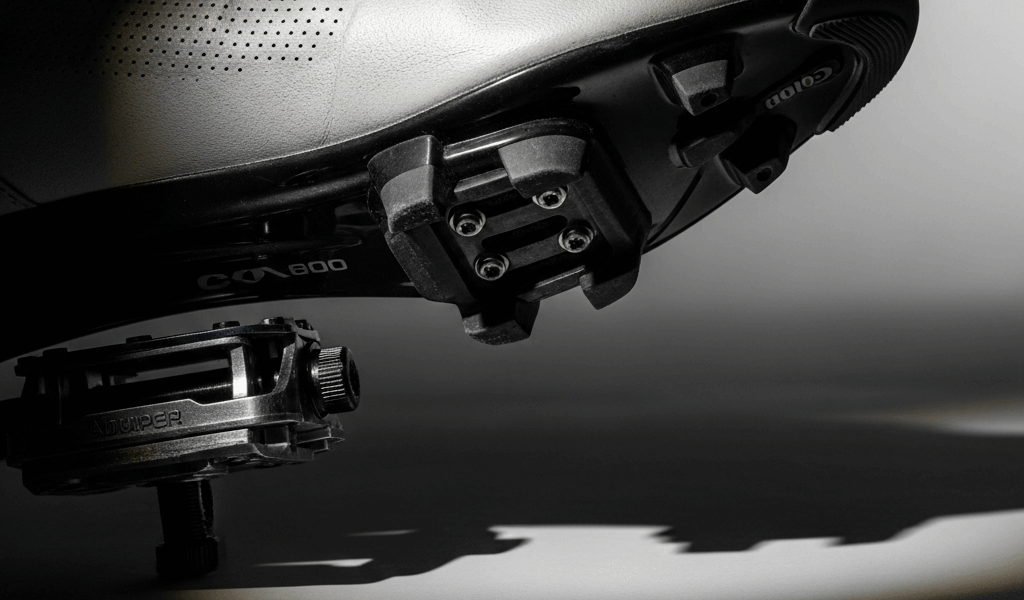
Your cleats live at the exact interface between foot and pedal. Every single revolution, they dictate the path your knee traces through space. Shift a cleat forward, backward, inward, or outward — even slightly — and you’ve changed the load distribution across your patellofemoral joint, your tibiofemoral joint, and all the soft tissue surrounding them. Small bolts. Big consequences.
Three adjustment axes actually matter here: fore-aft position (how close the cleat sits to your toes), lateral rotation (toe-in versus toe-out), and float (how much your foot can move once clipped in). Most riders obsess over float. In my experience — and apparently in the experience of most bike fitters I’ve talked to — the real culprit is almost always fore-aft placement or rotational position. That’s what makes cleat setup so sneakily frustrating.
How to Read Where Your Knee Hurts
Pain location tells you which direction your cleat is off. This is the diagnostic shortcut that saves you weeks of random guessing.
- Front of knee (around the patella) — Cleat is too far forward. Your foot is cycling under your body instead of over the pedal axle where it belongs.
- Back of knee — Cleat is too far back. Your hamstring and popliteus are grinding overtime just to extend your leg through each stroke.
- Inside of knee (medial) — Cleat is rotated too far outward, toe-out. Your knee collapses inward to compensate, every single pedal stroke.
- Outside of knee (lateral) — Cleat is rotated too far inward, toe-in. You’re fighting against your own natural foot position all day long.
Does your pain match one of these patterns? Then the cleat is probably the problem. Does it feel sharp and sudden only in certain positions, or does it come and go with cold weather or damp conditions? You might need to rule something else out first — but start here regardless.
The Self-Check Before You Touch a Screwdriver
Frustrated by competing advice on every forum I visited, I borrowed a goniometer from a physical therapist friend and spent a Saturday morning just measuring my own foot angles on the kitchen floor. Turns out my natural resting foot angle was 15 degrees toe-out. My cleats were set to zero. The whole time. No wonder my knee screamed on every climb over 20 minutes.
Start here before anything else: Sit on the edge of a chair with your feet flat on the floor, knees bent to 90 degrees. Look down at your feet without thinking about it — don’t force them into some imagined neutral position. Notice the angle your feet naturally settle into. That’s your baseline. Write it down if you need to.
Now grab a shoe with your current cleats installed. Sit again, foot positioned as if clipped in. Where exactly does your cleat sit relative to the ball of your foot?
The landmark rule: The ball of your foot is the first metatarsal head — the bony bump on the inside of your forefoot, just behind the big toe. Your cleat should sit roughly 5–10 mm behind that landmark. Not under it. Behind it. If the cleat runs through the middle of your forefoot, it’s already too far forward. Most people are surprised by how far back the correct position actually feels.
For rotation, match your natural foot angle within 2–3 degrees. Natural angle of 10 degrees toe-out? Your cleat should be 10 degrees toe-out. Not zero. This part sounds obvious once you hear it. It took me three seasons to hear it.
Step-by-Step Cleat Adjustment for Knee Pain
- Loosen the three bolts holding the cleat to the shoe. A 4 mm Allen wrench handles most cleats — that’s the standard. Loose enough to slide the cleat by hand, not so loose they fall out onto your garage floor. Test with a finger.
- Adjust fore-aft position first. Slide the cleat back until it sits 5–10 mm behind the ball of your foot. A ruler taped along the shoe sole helps here — I used a strip of painter’s tape with marks every 5 mm. Tighten the bolts to 4–5 Nm if you have a torque wrench. If you don’t, snug them firmly but don’t crank. You’ll feel the difference between “secure” and “I’m about to strip this bolt.”
- Check your natural foot angle by standing barefoot in front of a mirror — full-length works best. How far out do your toes point? Now adjust your cleat rotation to match. Most road setups use SPD-SL cleats from Shimano, three bolt holes, free rotational adjustment. Mountain and gravel riders typically run SPD cleats, smaller and with a rotational range of roughly 0–15 degrees. If your natural angle is 20 degrees toe-out and you’re running SPD cleats, you’ve already hit a hardware limit. That’s worth knowing before you chase a phantom adjustment.
- Re-tighten to spec. Road cleats — 4–5 Nm. SPD mountain cleats — 2–3 Nm. Torque wrench if you own one. If not, snug until you feel resistance, then turn another half-turn. Aiming for “won’t slip,” not “will snap.”
- Test ride on flat, low-traffic ground. Ten minutes minimum. Notice exactly where pain appears — and whether it’s better, worse, or identical to before.
- Reassess after 3–5 rides. Knee pain doesn’t vanish overnight. Inflammation takes time to quiet down. Make one change per week, not three adjustments per afternoon. Don’t make my mistake.
On float itself — that’s the rotational give built into the cleat mechanism, separate from your manual rotation adjustment. Shimano SPD-SL cleats come in three float options: 0 degrees (fixed, yellow), 2 degrees (red), and 6 degrees (blue). Riders often assume more float is automatically better for injured knees. That’s not always true. Strong, consistent foot angle? Fixed cleats work fine. Ankle mobility issues or a foot that wants to wander throughout the stroke? Six degrees gives your knee some breathing room. Most people honestly land somewhere in the middle — 2 degrees. I’m apparently a 2-degree person, and the red cleats have worked for me while fixed cleats never did.
When the Cleat Is Not the Problem
Probably should have opened with this section, honestly. Not all knee pain traces back to cleat position.
Saddle height is the invisible culprit in maybe 30% of cases I’ve read about and two cases I’ve personally witnessed. Too high, and your knee overextends at the bottom of every stroke. Too low, and you’re compressing your patellofemoral joint with nowhere to go. Adjusted your cleats and pain persists? Check saddle height before touching anything else. We’ve written a separate deep-dive on that — worth reading before you buy anything new.
Shoe stiffness matters too — more than most people expect. A soft shoe flexes under load, forcing your foot to constantly stabilize against the pedal. That instability travels straight up to your knee. If you’re riding 10-year-old road shoes with a 6.5 stiffness index and you’ve recently switched to harder terrain or higher wattage efforts, that’s worth investigating. A stiff shoe that’s too aggressive creates its own problems — hotspots that alter pedal contact and change how force moves through your foot.
Q-factor — the distance between your pedal axles — also influences knee tracking in ways that sneak up on you. Wider platforms, like some mountain bike options, push your knees outward through the stroke. Switched pedals recently? Go back to your old ones for a week and see what happens.
Real talk: If you’ve positioned your cleats correctly, confirmed your saddle height, ruled out shoe issues, and the pain still persists beyond two weeks — book a session with a bike fitter. A good fitter runs $100–300 depending on your city. That’s one visit to a specialist who can spot hip imbalance, ankle stiffness, or quad dominance — none of which any amount of cleat-twiddling will fix. That’s not a failure. That’s smart self-diagnosis followed by the right professional help at the right time.


Stay in the loop
Get the latest cyclingfan.org updates delivered to your inbox.