Why Clipless Pedals Cause Knee Pain in the First Place
Clipless pedal knee pain has gotten complicated with all the conflicting advice flying around. Forums say one thing. Your riding buddy says another. YouTube coaches tell you to spend $300 on a professional fit before you’ve even tried adjusting anything yourself.
As someone who spent three full seasons blaming the wrong thing, I learned everything there is to know about clipless knee pain the hard way. Today, I will share it all with you.
The dull throb showed up on the inside of my left knee. Every single long ride. I assumed clipless pedals were just incompatible with my body — that my biomechanics were some kind of special disaster. So I rode through it. Don’t make my mistake. The actual problem wasn’t the pedals. It was three fixable things: cleat position, float setting, and saddle height. That’s it.
Your knee is a hinge joint. It moves in one plane. When you’re clipped in, your foot is locked at a specific angle relative to the pedal — and if that angle fights what your knee naturally wants to do, you get inflammation. Sometimes within the first hour. Sometimes two days later when you’re just walking to the kitchen wondering why stairs suddenly feel personal.
These three culprits work together. Cleat position sets where your foot sits relative to the pedal axle. Float determines how much your heel can swing side to side before releasing. Saddle height changes your leg angle across the entire stroke. Get one wrong and your knee pays. Get two wrong and you’re icing your leg every evening.
Here’s what nobody tells you: most of this is fixable at home. A ruler. A marker. A wooden paint stick works fine as a straight edge. That’s genuinely all I used.
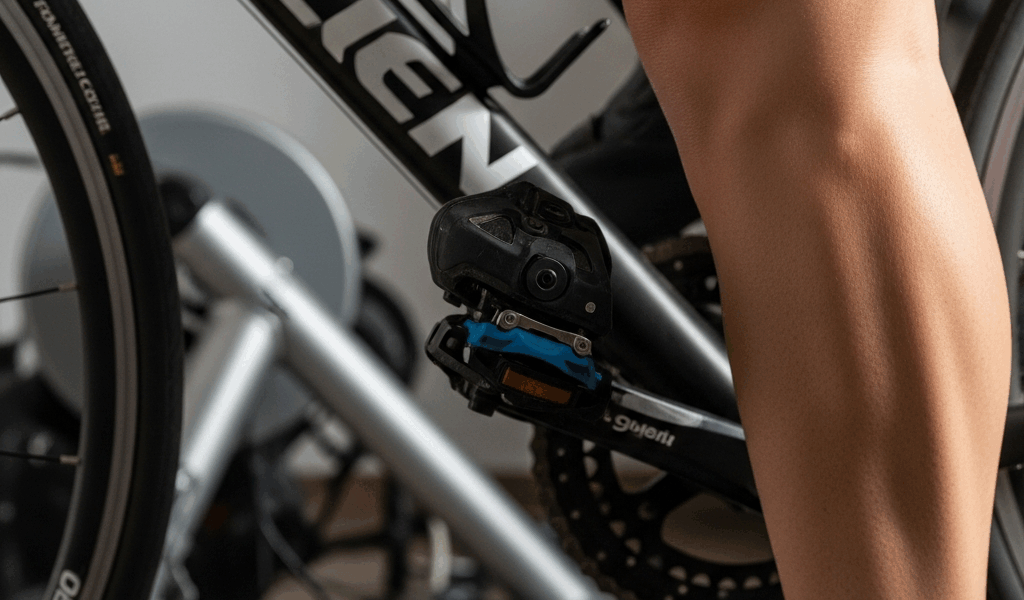
How to Check Your Cleat Position in 5 Minutes
Cleat placement is where most riders go wrong — and also the easiest thing to actually check yourself.
Pull off your cycling shoe and look at the sole. There’s a bump right under the ball of your foot. That’s the metatarsal head — the bony ridge where your arch ends and your toes begin. Mark it. A Sharpie works. A strip of electrical tape works. That spot needs to align roughly with the pedal axle when you’re clipped in.
Put the shoe back on. Clip in while you’re sitting on the bike. Hold something straight — I used a $2 wooden paint stick from Home Depot — vertically against the pedal axle. Does your marked spot line up? Or is your cleat sitting too far forward, pushing the ball of your foot ahead of where it belongs?
Frustrated by persistent knee pain and convinced his $89 Specialized shoes were fine, I finally flipped one over and looked. The cleats came pre-installed almost a full centimeter too far forward. Every single pedal stroke was destabilizing my foot position, and my knee was compensating the entire time. The fix took maybe 10 minutes — unbolting the cleats, sliding them back, tightening everything down with a 4mm hex key.
Road cleats — Look Kéo, Shimano SPD-SL, Speedplay — give you real fore-aft adjustment range. Mountain bike SPD cleats are smaller, but you still get 5 to 8 millimeters of play. Use it.
Too far back and you feel pressure under the ball of your foot. Too far forward and your knee gets cranky within the first 45 minutes. Aim for that metatarsal alignment as your starting point — not perfection, just a reasonable baseline your body can work from.
Float Setting and Why It Matters More Than You Think
But what is float? In essence, it’s the amount of heel rotation your shoe allows before the cleat releases from the pedal. But it’s much more than that — it’s the difference between your knee tracking naturally through the stroke or fighting a fixed angle for four hours straight.
Most riders completely ignore this setting. They buy whatever cleats came with the pedals and never think about it again. That’s a mistake.
Your feet don’t naturally point straight ahead. Your femur angle, hip structure, and general anatomy all influence how your knee wants to track. If your float is too tight, your foot gets locked into one position and your knee has nowhere to go. Over a long ride, that becomes inflammation.
Shimano makes this straightforward. SPD-SL cleats come in three colors: red is 0 degrees — completely locked. Yellow is 2 degrees. Blue is 6 degrees. I’m apparently a 6-degree person and blue cleats work for me while red cleats never did. Bought a pair of red ones once thinking “stability” was the goal. That was a bad month for my knees.
Look is less obvious about it. Kéo cleats require you to check the actual model number or the fine print on the box. Kéo 2 Max typically runs 6 degrees. Kéo 3 comes in 4.5 or 9 degree versions depending on which version you’re holding. Worth checking before you assume.
Honestly? If you have knee pain and you have no idea what float you’re running, just assume you need 6 degrees. It’s the middle ground — enough freedom for your foot to self-correct, not so much that the pedal feels sloppy. And swapping to 6-degree cleats costs around $15 to $25. That’s what makes float adjustment endearing to us cyclists: it’s a cheap fix that genuinely works.
Saddle Height Is Usually the Real Culprit
Probably should have opened with this section, honestly.
Saddle height causes more knee pain than cleat position and float combined. Too low and pain shows up behind the knee or directly in the kneecap. Too high and you get pain at the front of the knee or along the outer edge. The relationship is that direct.
There’s a quick check called the heel-on-pedal method. Sit on your bike normally. Place your heel — not the ball of your foot, your actual heel — on the pedal at its lowest point. Your leg should have a slight bend. Roughly 20 to 30 degrees of flex. Not locked out straight. Not bent like you’re sitting at a desk. Just a small, visible angle.
This isn’t a precision instrument. But it’s a useful starting point, especially if you’ve touched your saddle height recently or just got a new bike and guessed at the setup.
Chasing a position I’d seen in a YouTube video, I raised my saddle 12 millimeters over about a week. Within five days, the front of my left knee felt like it was getting pinched on every upstroke. Lowered the saddle 8 millimeters. Pain was gone in three days. That was a whole ordeal over less than a centimeter.
Make small changes — 5 millimeters at a time. Ride for two or three days before touching anything again. Your body needs time to register what changed before you go adjusting something else.
When to Stop Riding and Get a Proper Bike Fit
These home checks work for most people. Not everyone.
Stop self-diagnosing if pain is still there after two weeks of adjustments. Stop if you see swelling. Stop if the pain is sharp — sharp pain usually means something structural, not a cleat that’s 6mm off. And if you’ve started altering your pedal stroke to avoid pain, something deeper is going on and you need actual eyes on it.
A professional bike fit runs $150 to $350 depending on where you live and what tools the fitter uses. They’ll measure your leg length, assess your flexibility, record your pedal stroke on video, and dial in everything with precision. Worth every dollar when you’re genuinely stuck after trying everything yourself.
So, without further ado, let’s be direct about it: start at home first. Most clipless knee pain is fixable. You probably don’t need to abandon the pedals — you need to move a cleat back 5 millimeters, swap in some 6-degree float cleats, or drop your saddle a centimeter. Try those things. In that order. Your knees will notice.


Stay in the loop
Get the latest cyclingfan.org updates delivered to your inbox.