Signs Your Handlebar Height Is Too Low
Road bike fit has gotten complicated with all the conflicting advice flying around. As someone who spent two miserable months riding with a setup that was slowly wrecking my neck and shoulders, I learned everything there is to know about handlebar height the hard way. Today, I will share it all with you.
The symptoms crept up on me around forty minutes into a Sunday ride — that’s when my neck started screaming. Not a gentle suggestion. A full protest.
Here’s what to watch for:
- Neck and shoulder pain after 30+ minutes, even on flat terrain
- Numbness or tingling in your fingers from supporting too much upper body weight on the bars
- That stretched, overly aggressive position that makes you want to sit up every few miles just to breathe
- Tension crawling across your upper back and between your shoulder blades
- Wrists that feel bent and awkward — not neutral
- Constantly shifting weight off the bars to find relief
Probably should have opened with this section, honestly, because I spent two weeks blaming my saddle before realizing the bars were the real problem. Here’s the distinction that matters: saddle issues show up in your knees and hip flexors. Bar issues show up in your neck and shoulders. Different pain, different culprit. If your neck hurts and your traps are in knots after every ride, the bars are probably the problem — not the seat.
How Handlebar Height Actually Works on a Road Bike
But what is handlebar height adjustment, really? In essence, it’s the ability to raise or lower where your hands sit relative to the rest of the bike. But it’s much more than that — it controls your whole upper body angle, your weight distribution, and how much strain lands on your neck and wrists during a three-hour ride.
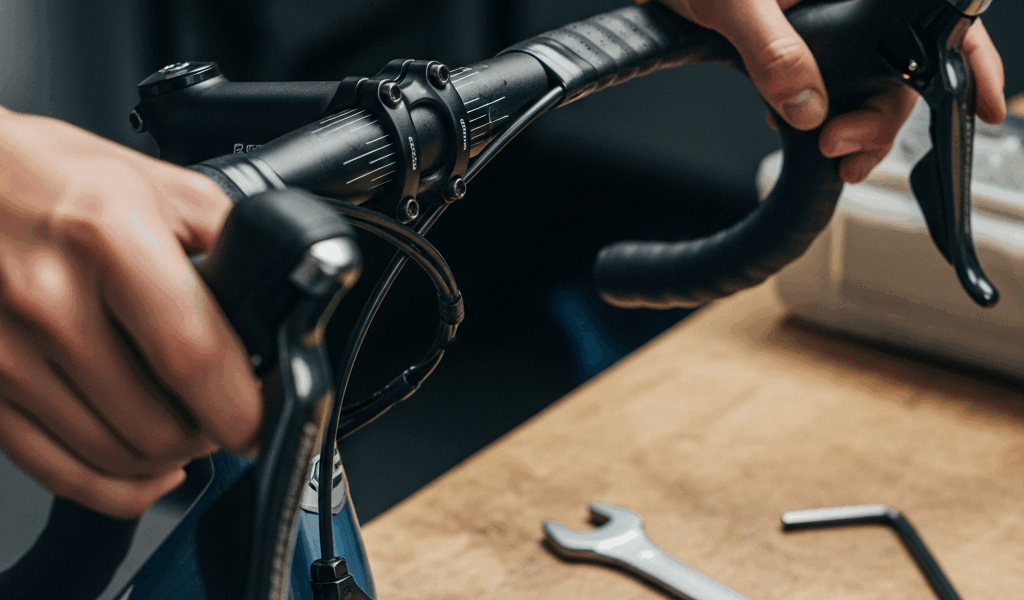
Your handlebars clamp onto a stem. That stem grips the steerer tube — the section of your fork that runs up through the headset and into the frame’s head tube. Two separate things control the final height.
First: stem rise angle. Stems are rated in degrees. A +6 degree stem angles upward. A -6 degree stem angles downward. Zero is flat. Second: spacers. These are thin aluminum or carbon rings — usually 5mm or 10mm thick — that stack on the steerer tube above or below the stem, shimming your bar height up or down without touching the stem itself.
Most road bikes ship from the factory with all the spacers sitting below the stem. That’s intentional — it leaves room to raise things later. Spacers above the stem means unused height potential. That’s your first move, and it costs nothing.
One more thing. Threaded headsets — found on older road bikes and most steel frames — work differently from modern threadless setups. Threaded stems tighten directly onto a threaded steerer tube using an expander wedge inside. Threadless systems use a star nut or compression plug. Don’t get lost in the terminology. Just figure out which type you have, then follow the matching steps below. That’s it.
Raising Handlebars by Moving Stem Spacers
This is the fix that works for most riders. While you won’t need a full tool kit, you will need a handful of basics: a 4mm Allen key, a 5mm Allen key, a torque wrench, and about twenty minutes.
For threadless stems:
- Loosen the stem faceplate bolts — the two bolts clamping the handlebar into the stem — about a quarter turn. Don’t remove them. Just release the tension.
- Loosen the stem clamp bolts on the sides of the stem. Usually 4mm or 5mm. Again, loose, not removed.
- Wiggle the stem upward off the steerer tube. It shouldn’t take much force. If it’s stuck, rotate it side to side slightly while pulling up.
- Pull the spacers from below the stem and restack them above it. Move them one at a time. Start conservative — 10mm is a solid first adjustment, and going further without testing is how you end up with a new problem.
- Slide the stem back onto the steerer tube. Eyeball it straight before tightening anything.
- Torque the stem clamp bolts to 4–6 Nm for aluminum steerers. Carbon steerers max out at 4–5 Nm — don’t overtighten. A basic torque wrench runs about $20 on Amazon. Worth every cent.
- Retighten the faceplate bolts to the same spec as before.
- Check for creaking. Any noise means uneven torque or a misaligned stem — loosen and restart.
One thing I learned the hard way: never push spacers past the minimum insertion line etched on your steerer tube. That line marks the floor. Drop below it and you’re risking headset damage — or worse. Most bikes ship with 20–40mm of total spacer material. Raising the bars 10–15mm is almost always possible without spending a dollar.
Flipping or Swapping the Stem for More Rise
Frustrated by a maxed-out spacer stack and still needing more height, I discovered the stem flip. A -6 degree stem flipped upside down becomes a +6 degree stem — free height gain of roughly 10–15mm depending on stem length. This new idea took off several years later among cyclists looking for a budget fit fix and eventually evolved into the go-to trick enthusiasts know and rely on today.
Same process as spacer moving: loosen, remove, flip 180 degrees, reinstall, torque. The one tradeoff is that flipping also shortens your reach slightly. Some riders love that. Others hate it. Test before committing.
Still not enough height after flipping? Swap the stem entirely. A quality aluminum stem with a +10 or +17 degree rise runs $40–$80 — brands like Ritchey, FSA, and Thomson make solid options at every price point. Carbon stems cost more and weigh less. I’m apparently a Ritchey guy and their WCS stem works for me while cheaper unbranded stems never felt solid under load. Don’t make my mistake of ordering the cheapest option on eBay twice before buying something decent.
Before ordering anything, measure your current stem’s clamp diameter — 31.8mm is standard on most road bikes — and its length. Getting that wrong means returning everything.
How to Check If the New Height Is Actually Right
Raising your bars is only half the job. Verifying the new position is the other half — and most people skip it.
First, you should take a test ride on a flat road or trainer — at least if you want an honest read on how the new setup actually feels under real load. Target 15–20 degrees of elbow bend. Arms slightly curved, not locked straight and not folded like you’re doing a pushup. Shoulders relaxed. Wrists neutral. If your palms are supporting serious weight instead of your core and legs doing the work, the bars are still too low or your saddle needs adjustment too.
A torque wrench might be the best option here, as any re-adjustment after testing requires proper torque specs. That is because carbon components in particular can crack silently if overtightened during repeated adjustments.
Incremental changes only. One centimeter at a time. Ride a few miles, evaluate, then move again if needed. That’s how you dial it in without swinging past the sweet spot.
One thing nobody tells you: raise your bars enough and your whole fit geometry shifts. Your saddle might suddenly feel too high. Your reach might feel too short. Everything interacts — handlebar height, saddle height, saddle fore-aft position. Budget time to revisit all of it after any significant bar raise.
If you’ve made three or four adjustments and still feel wrong on the bike, a professional bike fit is worth the $150–$300. A good fitter measures your flexibility, limb proportions, and movement patterns — not just the bike dimensions. That’s where DIY stops and expertise takes over. That’s what makes incremental self-adjustment so endearing to us tinkerers — but knowing when to hand it off matters just as much.


Stay in the loop
Get the latest cyclingfan.org updates delivered to your inbox.